Cat Feeder Fabrication
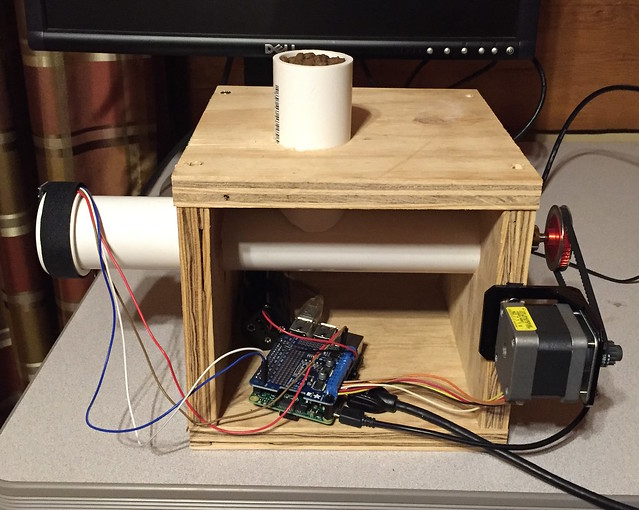
Now that all the parts have arrived it’s time to try again with fabrication for the cat feeder. The software for this project was MUCH easier than figuring out which parts I needed and how to fit them together! After much measuring and cutting, (good thing I bought extra PVC pipe,) here is what we came up with:
Parts List
As promised, here is a list of everything in the photo, with links to where it came from.
- Raspberry Pi 2 Model B
- Stepper Motor HAT
- Proximity Sensor
- Jumper Wires
- Stepper Motor (from eBay, used)
- Motor mount
- S3M Timing Belt 300mm (100T)
- S3M Timing Pulley 42T
- D-shaft
- Set screw hub
- Clamping collar (2)
- Dual ball bearing hub
- Flat round plate
- Aluminum L-stock and screws
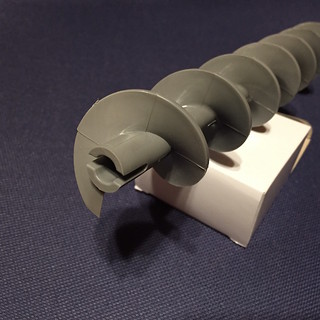
- Plastic augur from a chocolate fountain
- 1.5” PVC pipe and caps
- Power supply for RPi
- Power supply (battery holder) for Stepper HAT
- Plywood and screws
Also in use are a wifi adapter, monitor, HDMI cable, powered USB hub, and USB keyboard, not to mention the soldering and construction tools.
Don’t add it all up. You really don’t want to know.
This could have been done with much cheaper parts, but for my first “embedded” project, it was very useful to be able to develop in a familiar Linux (Raspbian) environment.
Notes
I bought several different length belts just in case, but by moving the motor up and down along the side of the box, I can adjust the distance between the pulley centers and get the belt tension right.
The battery pack is not ideal – it doesn’t have an off switch so the batteries have to be removed. By letting them run down I unfortunately killed a full set of our rechargeable AA’s. Now I’m careful to swap out the rechargeable batteries before they run down, or I just use alkalines. I’ll probably switch to a 12 volt plug-in power adapter.
When buying belts and pulleys, you may want to make sure they are all the same type. The stepper motor on Adafruit was out of stock for a while, so I grabbed one on eBay. It has a S3M pulley already attached, so I went to Fingertech for a shorter belt and another pulley. Adafruit’s pulleys and belts are GT2 which means the teeth have a different profile. It’s possible that these things are interchangeable, (one style has a rounded tooth, the other has a flat top,) but I did not want to risk it.
How It Works
ElixirCatFeeder from Wendy Smoak on Vimeo.
Food is added to the vertical tube, and when the proximity reading is “close enough”, the motor turns the pulley that turns the shaft that turns the augur, and food drops out of a hole in the horizontal tube. Simple!
This is the thing that turns:

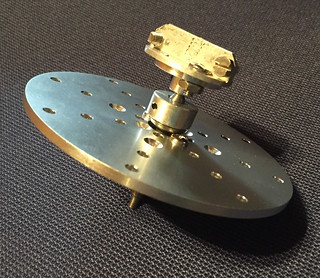
That’s two bits of L-bracket screwed together to make a T, then the hub, then a clamping collar, a little washer for spacing, the flat plate, and on the other side, the bearing, another clamping collar, and that’s where the red pulley you can see in the photo attaches.
I nixed the purchase of a $500 metal lathe, so the shaft was cut down (to fit the red pulley) with a belt sander. It’s not exactly centered anymore, but it works.
The T-shaped piece fits into the end of the plastic augur.
It’s only been three months since I started Blinking LEDs and Spinning Servos with Elixir, and two months since Turning a Stepper Motor with Elixir. March was taken up with ordering parts, (Fingertech! Servo City!) and then my chief fabricator refused to help until the income taxes were done, so that delayed things further.
Power and Math
The motor I bought is listed as 12-36V and 1.2A. Hmm… 1.2A at what voltage?
Anecdotally, a 12V 1.6A power supply that we had lying around did not work well, so we think needs more than that.
I asked the seller, and found out he tested it at 24V and got 1.2A, so it should draw 2.4A at 12V. That explains why the power supply we tried didn’t work.
The Motor Hat docs say “4 H-Bridges: TB6612 chipset provides 1.2A per bridge (3A peak) with thermal shutdown protection, internal kickback protection diodes. Can run motors on 4.5VDC to 13.5VDC.”
Adafruit support says “Each side of the H-bridge is still limited to 1.2A. It’s just that you can choose which direction the 1.2A goes.” and also “Actually, you’re more likely to get about 600mA [rather than the 2.4A I calculated]. The current-to-voltage ratio in a motor coil roughly follows Ohms Law. Half as much voltage gives you half as much current.”
I am now completely confused, but we’ll see how the 12V 5A power supply works when it gets here.
Software
The details of reading the proximity sensor and turning the stepper motor have been covered in previous posts, and the software project is available here:
What about Nerves? The project does have a Bakefile and I have deployed it that way a couple of times, but WiFi support hasn’t landed in Nerves yet, so while I’m still making changes, running on Raspbian is easier.
Next Steps
We still need to drill a hole in the front to pass the proximity sensor wires through (and wrap the wires so they don’t get chewed!)
I’m not sure how long the proximity sensor is going to last while exposed like that – it might have to go behind a bit of plastic if it gets abused. The cat learned very quickly how to make it work, but there is a 20 minute delay between feedings and she doesn’t understand why it doesn’t ALWAYS work.
For similar reasons it’s going to need sides on the box – too many things in there to push around and chew on in an attempt to get the food to come out.
I’d like to switch from polling the proximity sensor, to having it signal with an interrupt when something is near.
Since I’m only driving a single motor it should be possible to use this TB6612 breakout board instead of the full Motor HAT.
And obviously, it needs a Phoenix and Elm based web UI!
Conclusion
We’ve seen how to construct an automated cat feeder using Raspberry Pi based hardware and software written in Elixir.
The code for this example is available at https://github.com/wsmoak/cat_feeder and is MIT licensed.
Copyright 2016 Wendy Smoak - This post first appeared on http://wsmoak.github.io and is CC BY-NC licensed.